This post has been updated from its original version to correct the installation instructions, which have changed since the time the post was written in Feb 2009.
With the addition of .NET Framework to Server Core in Windows Server 2008 R2 the Server Core installation option became even more appealing for those who want to use a very low footprint server for hosting their applications. Availability of .NET framework provides the following great benefits:
- ASP.NET support – you can now use Server Core to host your ASP.NET applications.
- IIS Remote Management – Server Core does not provide any user interface other than command line. But if you prefer to use IIS Manager UI to administer IIS, you can now use IIS Remote Manager to connect to IIS on Server Core and perform all the management tasks from within familiar UI of IIS Manager.
- PowerShell – Windows Server 2008 R2 includes IIS PowerShell snapin, which is also available on Server Core.
This post describes how to setup and configure IIS on Server Core in Windows Server 2008 R2. Specifically the following tasks are described:
- Using oclist and ocsetup commands
- Basic Installation of IIS
- Installing ASP.NET
- Installing PowerShell and IIS snap-in
- Enabling IIS Remote Management
Using oclist and ocsetup commands
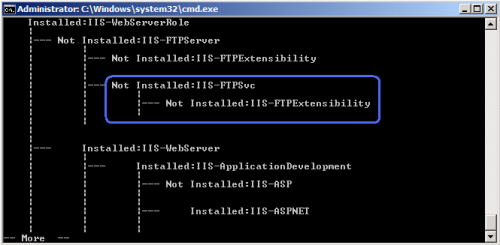
oclist command can be used to list the available and installed roles and services on the server. The output of the command looks similar to below:

It is important to understand how oclist renders component dependencies. For example, in the above screenshot the oclist output shows that IIS-FTPExtensibility is dependent on IIS-FTPSvc, so in order to install IIS-FTPExtensibility it is first necessary to install IIS-FTPSvc.
ocsetup command can be used to install and uninstall individual roles and services.
Basic Installation of IIS
To perform basic and default installation of IIS on Server Core run the following command:
start /w ocsetup IIS-WebServerRoleAfter the command has run you can run oclist | more and check which IIS components have been installed.
Installing .NET Framework
If you plan to use ASP.NET or IIS Remote Management then it is necessary to install .NET Framework first. To install it use the following commands:
start /w ocsetup NetFx2-ServerCore
start /w ocsetup NetFx2-ServerCore-WOW64
Installing ASP.NET
To install ASP.NET on Server Core run the following commands in exact same order as listed below:
start /w ocsetup WAS-NetFxEnvironment
start /w ocsetup IIS-ISAPIExtensions
start /w ocsetup IIS-ISAPIFilter
start /w ocsetup IIS-NetFxExtensibility
start /w ocsetup IIS-ASPNET
Installing PowerShell and IIS snap-in
First, install the PowerShell by running the command as below:
start /w ocsetup MicrosoftWindowsPowerShellNext, launch the PowerShell by running this command:
\windows\system32\WindowsPowerShell\v1.0\powershell.exeAfter running this command you should see a PowerShell prompt.
In order to enable the IIS snapin it is necessary to change the script execution policy by running this command:
Set-ExecutionPolicy RemoteSignedRestart PowerShell for the policy changes to take effect. After re-entering the PowerShell import the IIS snapin:
import-module WebAdministrationAfter that you can get the list of available IIS cmdlets by typing
get-command –module WebAdministrationRefer to the article Managing IIS with IIS 7.0 PowerShell Snap-in for more information.
Enabling IIS Remote Management
In order to install IIS remote management service it is necessary to install .NET Framework first. Refer to the Installing .NET Framework section above for more details.
Install the IIS management service by executing this command:
start /w ocsetup IIS-ManagementServiceThen enable remote management by running this command:
reg add HKEY_LOCAL_MACHINE\SOFTWARE\Microsoft\WebManagement\Server ^
/v EnableRemoteManagement /t REG_DWORD /d 1
And finally start the management service:
net start wmsvcNow you can connect to the IIS on the Server Core from a remote machine by using IIS Remote Manager.
Acknowledgement: thanks to Saad Ladki and Thomas Deml from IIS team for explaining to me all these steps.

Hello,
Ruslan has a very bad habbit in the fact that he is very well know for leaving out very important steps. Since no one is going through this content anymore and fixing it, as when I wrote for the boys in blue this was always a huge issue coming from the Product Team, Ill take this chance to get everyone moving is the correct direction.
If you notice that the Remote Management Service for IIS 7 on Server Core R2 is not functioning and shows up as Not Installed when runingng OCLIST | MORE then try these steps to troubleshoot it.
dism.exe /Online /Enable-Feature /FeatureName:IIS-Managem
entService
start /w ocsetup NetFx2-ServerCore
dism.exe /Online /Enable-Feature /FeatureName:IIS-Managem
entService
@AJ: Thanks for your comment. The article was written when R2 was in beta and these exact steps worked and I did not leave out any important steps. But then the RTW of R2 had some breaking changes and the instructions stopped working, but I did not have time to go and fix the article. If I get time I will update it.
Can you give any examles where I left out the important steps?
Also, please read the disclaimer on my blog home page.
The post has been updated with instructions for final version of Windows Server 2008 R2.
Thanks for this information. It was exactly what I needed!